Showing posts with label fixing. Show all posts

Wednesday, October 2, 2013

FIXING - jeans rear pocket


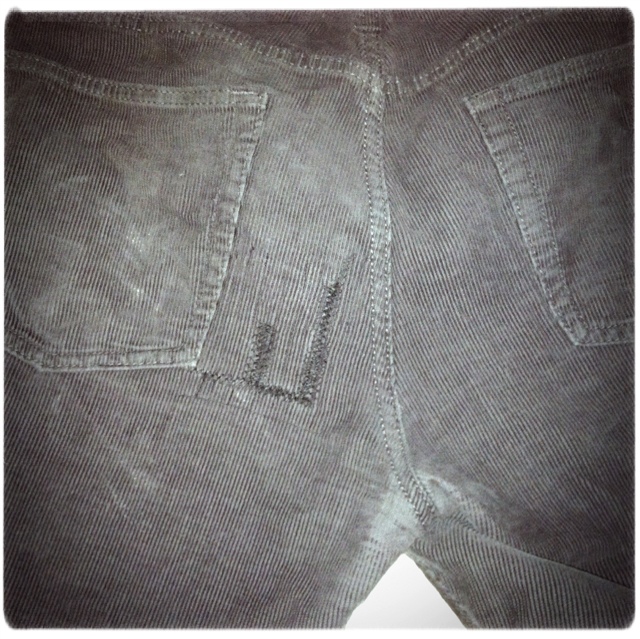
A friend tore the back of his pants. Right down the inner side of a back pocket. It was a long tear down the grain. No connective threads at all.


Because this will require visible stitches, I made sure to use matching thread. It is kind of shiney, but its a butt so it will get dirty in no time with sitting and all.


I made one wide zig zag down the length of the tear (mainly joining both sides together).

I picked some material to reinforce the back holding the sides together. I used a soft thinish wool fleece scrap, soft side facing in.  (it is really important to think about what kind of material you use to do mending on jeans. Does it stretch a little but not too much? is it scratchy? will it fray? etc...)

Make sure that the mending scrap is at least 1/2 to 1 inch wider than the area to be mended (in all directions).


Place the material under your area to be mended. Pin that s in place.


I went in zig zags up and down the tear and then two on each side.


Here is how the mending material looked inside. This is why it is nice to cut it extra large.


Trim the mending material and stray threads. I realize that my tension was off for some of the stitches, but it should be fine.


Here they are done.


I did not realize how drastically different flash and no flash would be for the color/white balance. Let me learn that lesson for you. If taking pictures inside, choose one or the other unless you are using bright natural light for the unflashed (and maybe even then too...). 

Wednesday, May 15, 2013

FIXING - hemming jeans

A friend wanted some pants hemmed. He wanted them to be about four inches shorter.

I pinned them at the length he picked.


I changed one leg of the pins so that original hem was pinned at the desired length.
(then I pinned the other to match. Keep the second pinned as a reference while you adjust the first leg!)


I put a zipper foot on to get the stitches as close as I could. A zipper foot is not necessary.


sew sew sew - - - - - - - - - - - - - - - - - - - - - - - take the pins out as you go!


Here it is, all sewn up. Where is the new seam? Right?


It's there.


I kind of regret cutting the material, but for how much it was shortened, it seemed kind of necessary to get rid of the extra bulk.


I then zig-zagged along the edge of the cut fabric.
(If you used a zipper foot DON'T FORGET to put a regular foot back on.)


Fold the original hem down and iron.


After ironing the fabric, I sewed the sig-zagged part of the pants surgery above the hem seam (inside). In simple straight stitch in a color that didn't really stand out.

Wednesday, March 20, 2013

FIXING - boys will be boys - pants mending

Against better judgment a friend of mine climbed onto his apartment building roof late one night at a party. While on his adventure he caught the seat of his pants on a nail or something and tore the corduroy material. I said I would fix it.
That was months ago. I kept the pants an extra long time as a penalty for doing something so stupid.

Here is the rip with some pink paper behind it, to highlight the damage.


I took a scrap of similar baby/fine wale corduroy, trimmed the edges with pinking shears, and used spray adhesive to properly position it on the rip. I put the patch on the inside. Here it is.


Here is the outside of the tear after affixing the fabric patch inside. I trimmed all stray threads to make the torn edges clean.


I used a wide short zig zag to cover the rip. About 5 rows back and forth tracing the path of the tear. After that I sewed the perimeter of the patch in a small straight stitch. Along the pocket edge I sewed along the existing seams. I sewed along the lines of the corduroy about every half inch to really attach the patch (because the fabric there was stressed from the hole).

Here it is on the inside.


Here is the mending after from the outside.

Monday, March 18, 2013

FIXING - wool glove - darning


A stitch in time saves nine.

I try to instill this this in the minds of my friends. Especially those I do mending for. Small hole darning is so much easier than recreating a fingertip or elbow.

One friend of mine gets holes in his liner gloves. He also has kept that stitch in time adage in mind.

Here is the before picture. The holes are so small it is hard to see them.


BASIC DARNING INFORMATION FOR SMALL KNIT HOLES.

Here is a hole.


With your mending thread of choice, secure the perimeter. Find the intact loops of stitches on the edges of the holes and run your darning thread through them. Sometimes you have to go back a row or two to find a good loop to go through.


Recreate the fabric for the hole with long stitches in one direction (this example, vertically).


Now start recreating the fabric horizontally. Weave the thread in and out of the vertical threads.


If the hole is very small, like in this case, after securing the perimeter you might just have to stitch the hole shut.

I do not have a darning tool, so I use the handle of my knife sharpener for finger darning.


For the first hole I used some grey sock yarn.


Here is the first hole, mended.


The sock yarn was a little too bulky, so for the fingertip mending, I used heavy duty quilting thread.


Here is the hole before.


Here is the hole after.


Here is the glove, all mended up... for now.

FIXING - jeans - zipper replacement

My friend had a pair of jeans that needed some fixin'. The zipper broke. I maybe would have repaired the zipper, but decided to replace it, since mending this kind doesn't usually work.

As you can see, the zipper pull has detached from one side, rendering it useless.


I couldn't find my stitch ripper, so I carefully used my xacto knife.


I undid all the stitching that held the zipper in place. There are a lot of seams, this is tedious.


I attached the new zipper at the base first. Here it is.


I figured out how long it needed to be and trimmed the top, then tucked it into the open seam at the waistband.


Here it is, replaced and fully functional.


This zipper has a locking top. Very important to know, if you don't lock it, it unzips instantly.


I try to make things look a little nice when returning them. A little yarn wrapped around with a bow does the trick!


Music is important for sewing. Today I listened to my Trapp Family Singers record.


LAST WORDS ON THIS PROJECT
Girl/womens jeans with short 'low rise' zippers are quite a bit more annoying to fix than mens/regular length zipeprs. There is just so little space to work with/within. They turned out, but I have to say I do a better job with classic length zippers and real denim, not this stretchy thin material.